Product Description
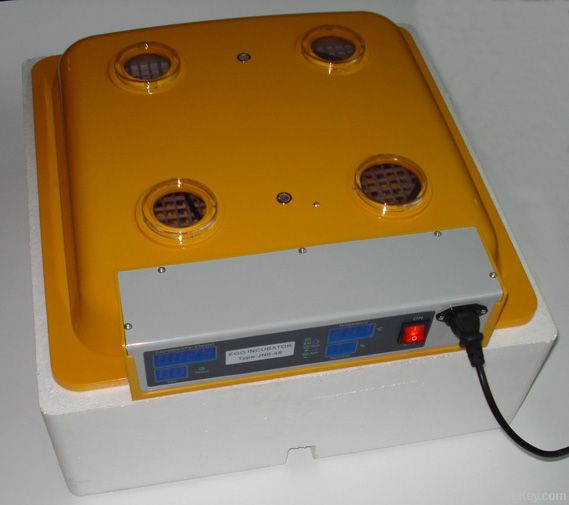
Small incubator/family incubator/full automatic *****'s capacity is *8pcs egg.
1. Open the box and check the incubator, check whether all of the accessories inside of the packing box are well-equipped.
2. Before use, remove the top cover on the incubator, there are movable egg tray bracket and egg tray mesh inside the base. In order to prevent damage during the transportation, the base, movable egg tray bracket and egg tray mesh are tied up during package, please disassemble it before use.
3. Take movable egg tray bracket and egg tray mesh out of the base. Wash and clean the base, feed water to tank A and B inside of base, then put the movable egg tray bracket into the base, check whether the motor power supply of movable bracket is connected well or not, it shall be connected with special connector of top cover.
4. After covering the top cover, rightly connect the power line and switch on the power supply, if data on the control panel displays in normal condition, the heating indicator will be on after 2 minutes and the incubator will begin to heat up.
5. Adjust the temperature at *8â?? by adjusting knob. Check all of the data after *0 minutes. Countdown displays minute change and number of days (change once for every *4h), the incubation temperature requires at *7.*-incubator.........
I.Operating Steps:
1.Open the box and check the incubator, check whether all of the
accessories inside of the packing box are well-equipped,
including top cover, base, automatic egg turning tray, egg tray
mesh, operation instruction and egg tray bracket.
2.Before use, remove the top cover on the incubator, there are
movable egg tray bracket and egg tray mesh inside the base. In
order to prevent damage during the transportation, the base,
movable egg tray bracket and egg tray mesh are tied up during
package, please disassemble it before use.
3.Take movable egg tray bracket and egg tray mesh out of the
base. Wash and clean the base, feed water to tank A and B inside
of base, then put the movable egg tray bracket into the base.
4.After covering the top cover, rightly connect the power line
and switch on the power supply, if temperature is indicated on
the control panel in normal condition and the heating indicator
(Work) is on, the incubator will begin
to heat up.
5.Note:when ambient temperature is less than *5℃,
measure shall be taken for heat
preservation, it’s good for temperature uniformity when the
device is enclosed with clothes or other warms, and it also helps
energy-saving and reduces heat dissipation. Use thermometer to
correct temperature display before use, CA parameter can be
adjusted.
6. Check all parameters according to Push-
Instruction.
7. The motor on egg tray shall be connected with joint inside of
top cover, the egg tray runs a round each 2 hours and the motor
runs a round each four hours.
8. Switch on the power supply and turn the switch on, and
the indicator on panel is red, just release the alarm by pushing
“SET”“+”“-”when the temperature displays “L” and it sends
temperature alarm, the incubator can be put into running
if everything is normal after 2 hours’
trial.
9.It’s about to incubate, put the selected eggs well and the
bigger side shall be up, take down the incubation time.
*0. The incubator begins to incubate, pay attention to the
temperature indicated on the control panel, adjust it in time if
it doesn’t comply with requirement, check the water level for
every **3 days so as to avoid incubator in lack of water.
*1. After incubation for ****9 days (take egg as example),
the egg tray shall be exchanged, firstly, take the egg off from
movable egg tray bracket after power supply is cut off, and take
egg tray out of the incubator after disconnecting the motor
joint, put the egg tray mesh into the incubator, and lay one
layer of egg on the egg tray mesh, then wait for the young poult
to hatch.
*2. The egg tray exchange time is different
according to number of incubation days of kinds of poultry, it
usually takes **4 days less than the number of incubation days.
It’s also the time to exchange the egg tray when one or
two eggs hatches.
*3. Pay attention to temperature and relative
humidity adjustment during the whole incubation process, refer to
Incubation Technology in the operation instruction for
more details.
II. Important for Safety
1. Only the power supply marked on the incubatorcan be used, ******0v;
2. Don’t put any goods on the wire, the power line of
incubator shall be placed where it won’t be stepped on or make
people trip and fall;
3. Make sure that the socket and extension line in use don’t
overload, otherwise, it may cause fire or electric shock;
4. If the incubator is smoking, or sending abnormal smell or
unusual noise, please cut off the power supply and pull down the
power line to stop the fault, after that, contact the agency or
maintenance center;
5. Please don’t touch the power line with wet hand, or it
may cause electric shock;
6. This incubator can’t be exposed to rain and sunshine;
7.Make sure that the power supply is switched off before cleaning
the incubator;
8. The incubator shall be placed in room where is ventilated
without vibratory equipment, it can’t be placed in room with fast
air movement or room with harmful and noxious chemicals and other
pollutants.
9 Don’t block the air-bleed hole when the incubator is in
work condition.
III.Push- Instruction:
1. SET:
A: Push SET once to enter temperature control set, push <+>
or <-> to adjust parameter, push<+>or <-> for
3s to enter fast adjustment mode, push SET again to exit from
setting state.
B: Push SET for 3s to enter system menu set, push <+> or
<-> to select menu in need of adjustment, then push SET
again to enter relative parameter setting state, push <+>
or <-> to adjust parameter in need of modification, push
RST to exit after adjustment, or the system will exits after 5s
delay.
2.<+>:Up
3.<->: Down
Operation Instruction:
Indicating lamp state instruction:
WORK lamp on the left side of display screen is made as work
indicating lamp, LED normally on means it’s in heating state.
SET lamp on the left side of display screen is used for
indicating lamp set, LED normally on means it’s in setting state.
Function instruction:
◆HU,HD:
Parameter HU and HD is set by factory, when temperature exceeds
setting value in summer, parameter HU and HD shall be drop, when
temperature can’t rise to setting value in winter, HU and HD
shall be increased.
◆Temperature correction set:
When measuring temperature deviates from reference temperature,
temperature correction function shall be used to make the
measuring value in accordance with reference temperature,
temperature after correction shall be the sum of temperature
before correction and correction value (correction value can be
positive number, negative number or zero).
◆Temperature correction set:
Push “SET” for 3s to enter menu display, push <+> or
<-> until code “CA” appears on screen, then push “SET” to
display temperature correction setting value, push <+> or
<-> again to adjust parameter.
◆Upper and lower limit function:
HS and LS set limits setting range of temperature control, e.g.,
if HS is set as *9.5 and LS is set as *0, then the temperature
can only be set from *0 to *9.5, so the display value still keeps
as **0 after pushing“-” if it
displays *0; the display value still keeps as *9.5 after pushing
“+” if it displays *9.5. If setting value is beyond the setting
range, then HS and LS must be changed at first.
◆ Upper
and lower limit set:
Push “SET” for 3s to enter menu display, push <+> or
<-> until code “HS” or “LS” appears on screen, push “SET”
to display upper or lower limit setting value, then push
<+> or <-> to adjust the parameter. HS means upper
limit and LS means lower limit.
◆High temperature alarm function:
If measuring temperature is higher than sum of setting
temperature and AH, the temperature controller sends alarm and
the display screen alternately displays H and current
temperature. The alarm can stop by pushing any .
◆High temperature alarm set:
Push “SET” for 3s to enter menu display, push <+> or
<-> until code “AH” appears on screen, push “SET” to
display high temperature alarm setting value, then push <+>
or <-> to adjust parameter, the high temperature alarm
function can be closed when AH is set as 0.
◆Low temperature alarm set:
Push “SET” for 3s to enter menu display, push <+> or
<-> until code “AL” appears on screen, push “SET” to
display low temperature alarm setting value, then push <+>
or <-> to adjust parameter. The low temperature alarm
function can be closed when AL is set as 0.
| Country: |
China |
| Model No: |
JN8-48
|
| FOB Price: |
( Negotiable ) (Negotiable)
Get Latest Price
|
| Place of Origin: |
china |
| Price for Minimum Order: |
- |
| Minimum Order Quantity: |
30 Set |
| Packaging Detail: |
box/carton |
| Delivery Time: |
within 20 days after received payment |
| Supplying Ability: |
100000 Set per Year |
| Payment Type: |
T/T, Western Union, Money Gram |
| Product Group : |
Livestock equipment
|


")

